jQueryプラグイン Strip
画像や動画が画面外の上下左右からおしゃれにスライドする、レスポンシブなLightboxです。

デモ
設定
https://www.stripjs.com/ ここからファイルstrip-x.x.xをゲットします。設置場所やファイル名は各々好きなように。
まず↓を読み込ませます。
|
1 |
<script type="text/javascript" src="https://ajax.googleapis.com/ajax/libs/jquery/1/jquery.min.js"></script> |
次にダウンロードしたファイル内のstrip.pkgd.min.jsとstrip.cssを読み込ませます。
|
1 |
<script type="text/javascript" src="strip-1.5.1/dist/js/strip.pkgd.min.js"></script> |
|
1 |
<link rel="stylesheet" type="text/css" href="strip-1.5.1/dist/css/strip.css"/> |
HTML(基本)
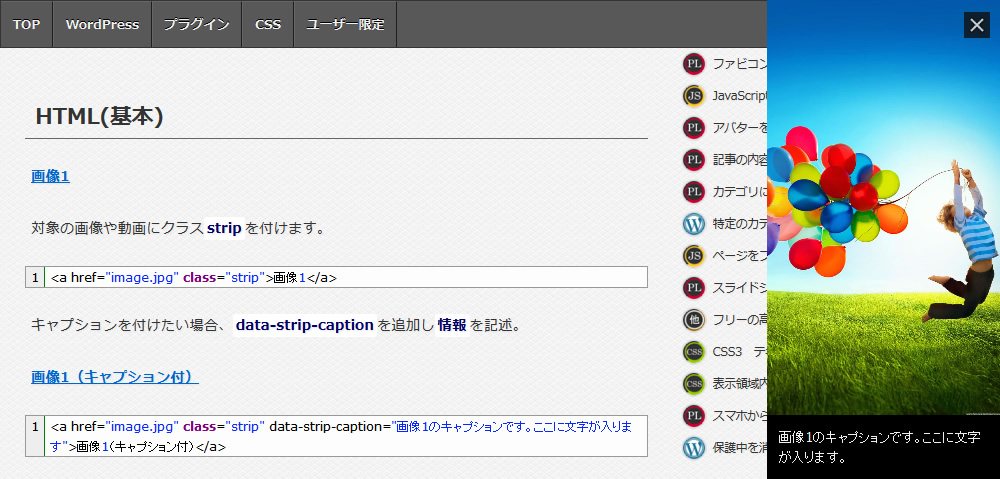
- 画像1
対象の画像や動画にクラスstripを付けます。
1<a href="image.jpg" class="strip">画像1</a> - キャプションを付けたい場合、data-strip-captionを追加し情報を記述。
画像1(キャプション付)
1<a href="image.jpg" class="strip" data-strip-caption="画像1のキャプションです。ここに文字が入ります">画像1(キャプション付)</a> - 動画1
YouTube動画のURLは通常のURLでも短縮でもどちらでもOKです。
https://www.youtube.com/watch?v=***********
https://youtu.be/***********
1<a href="https://youtu.be/FxMOOyQI99g" class="strip">動画1</a>
複数の画像や動画をグループ化
グループ化すると画像の左右にページをめくる矢印が出るようになります。
data-strip-groupを追加しグループ名を付けます。
|
1 2 3 |
<a href="image1.jpg" class="strip" data-strip-group="group1">画像1</a> <a href="image2.jpg" class="strip" data-strip-group="group1">画像2</a> <a href="image3.jpg" class="strip" data-strip-group="group1">画像3</a> |
画像や動画の最大幅を指定
data-strip-group-optionsに最大幅を追加。
画像1を最大幅300pxとし、動画1とグループ化しました。
|
1 2 |
<a href="image.jpg" class="strip" data-strip-group="group2" data-strip-group-options="maxWidth: 300">画像1</a> <a href="https://youtu.be/FxMOOyQI99g" class="strip" data-strip-group="group2">動画1</a> |
※動画をグループ化すると矢印は外に表示され、その分幅が大きくなります。
グループ化した画像や動画の矢印をループさせない
画像の左右に出る矢印をループさせたくない場合です。画像1の<、動画1の>がでなくなります。
data-strip-group-optionsにloop: falseを追加。
|
1 2 3 |
<a href="image1.jpg" class="strip" data-strip-group="group3" data-strip-group-options="maxWidth: 500,loop: false">画像1</a> <a href="image2.jpg" class="strip" data-strip-group="group3">画像2</a> <a href="https://youtu.be/FxMOOyQI99g" class="strip" data-strip-group="group3">動画1</a> |
スライドエフェクトなし、矢印の位置
スライドのアニメーションをさせたくない場合、data-strip-group-optionsにeffects: falseを追加。
矢印を画像の上ではなく、画像の横に配置したい場合、overlap: falseを追加。
|
1 2 3 |
<a href="image1.jpg" class="strip" data-strip-group-options="maxWidth: 500,effects: false,overlap: false" data-strip-group="group4">画像1 (グループ4)</a> <a href="image2.jpg" class="strip" data-strip-group="group4">画像2 (グループ4)</a> <a href="image3.jpg" class="strip" data-strip-group="group4">画像3 (グループ4)</a> |
YouTube動画の幅と高さを細かく指定、自動再生の可否
- data-strip-group-optionsに、(例) width: 320, height: 180を追加。
動画1 (width: 320, height: 180)
1<a href="https://www.youtube.com/watch?v=FxMOOyQI99g" class="strip" data-strip-options="width: 320, height: 180, youtube: { autoplay: 0 }">動画1</a> - これはmaxWidth: 320と同じになります。
動画2 (maxWidth: 320)
1<a href="https://www.youtube.com/watch?v=FxMOOyQI99g" class="strip" data-strip-options="maxWidth: 320, youtube: { autoplay: 0 }">動画2</a> - (例) width: 320, height: 100を追加。
動画3 (width: 320, height: 100)
1<a href="https://www.youtube.com/watch?v=FxMOOyQI99g" class="strip" data-strip-options="width: 320, height: 100">動画3</a> - 自動再生しない場合、youtube: { autoplay: 0 }を追加。
スライドしてくる方向を指定
指定しない場合は右からスライドします。
data-strip-group-optionsにside: ‘方向’を追加。なし(←)、left(→)、top(↓)、bottom(↑)
|
1 2 3 4 |
<a href="image1.jpg" class="strip">画像 (指定なし)</a> <a href="image2.jpg" class="strip" data-strip-options="side: 'left'">画像 (left)</a> <a href="image3.jpg" class="strip" data-strip-options="side: 'top'">画像 (top)</a> <a href="image4.jpg" class="strip" data-strip-options="side: 'bottom'">画像 (bottom)</a> |
背景を透過
ウインドウの背景を透過、キャプションの背景色を白に変更し透過、キャプション内の文字色を黒に変更。
CSS
|
1 2 3 4 5 6 7 8 9 10 11 12 13 |
/*ウインドウの背景を透過*/ .strp-container, .strp-window{ background-color: rgba(0,0,0,0.6);} /*キャプションの背景色を白に変更し透過、文字色を黒に変更*/ .strp-info { color: #000; background-color: rgba(255,255,255,0.6); } /*ページ番号の文字色を黒に変更*/ .strp-position { color: #000; } |


コメントを残す